Blackboard Course Copy
Please read this entire post before copying your course. While the process is easy, it is also important to avoid common mistakes.
When to Use Course Copy
The course copy process can be used to copy an entire existing course, including all tests, lessons, pages, documents, assignment drop boxes, etc., from one course to another. The most common case is copying a course you teach from one term to a newer term.
When NOT to Use Course Copy
There are also some cases in which course copy may not be your best action:
- If you have not built in Blackboard before, please use the instructions to import a course structure.
- If you want to move tests or pools from one course to another, please follow the Blackboard Tests and Pools Export/Import Instructions.
If you're unsure which process suits your needs, Online Learning 503 491 7170 can help.
Before you Begin
The course copy process must be completed before any other content is added to the course and before any edits are made to the course.
- After submitting your course copy (see below), DO NOT make ANY edits to your course until you receive a confirmation email that the course copy process has completed.
- If your copy does not look as intended, DO NOT COPY AGAIN. Contact Online Learning for help.
- Do NOT copy a course more than once into the same target shell or copy multiple courses into the same shell. This will result in duplicate content, duplicate grade center columns, etc. Contact Online Learning for assistance if you need to copy elements from different shells.
To copy course content...
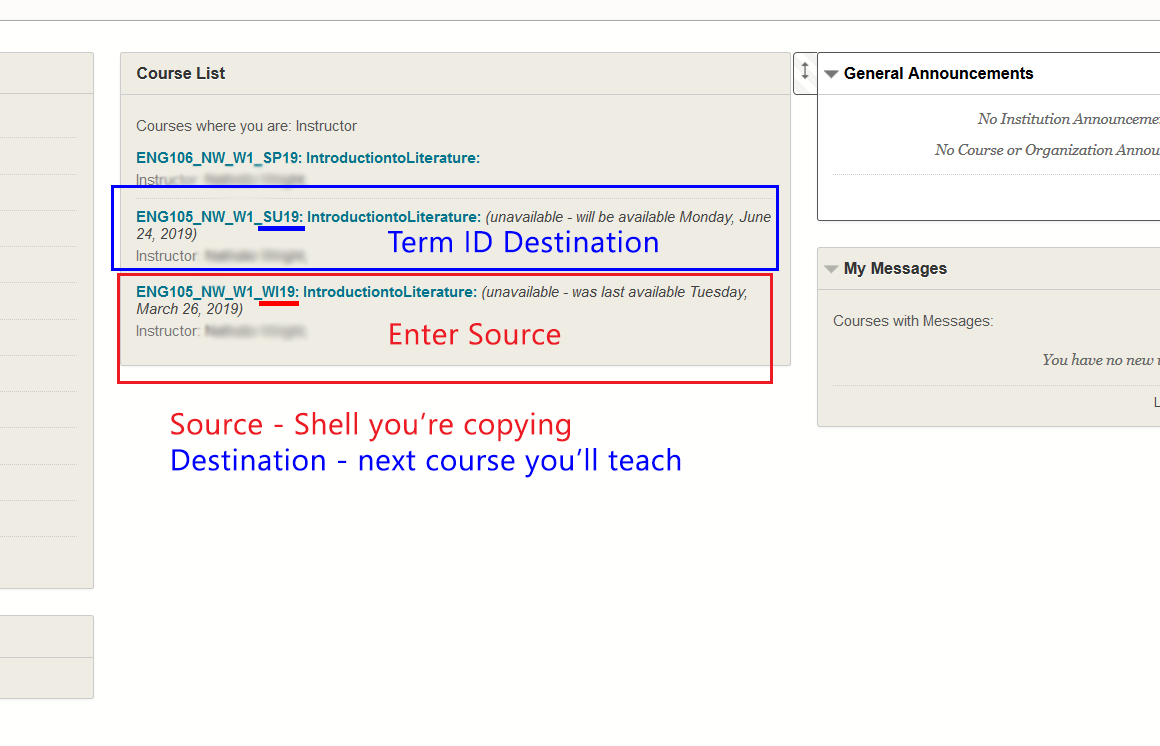
- Enter the source course. This should be the course shell with existing content you want to copy.
- From Course Management Menu in source course, select Packages and Utilities
- Choose Course Copy

- Copy Type is fixed by default to the correct copy option.
- Browse Destination Course

- You may see a long list of courses. TIP: Use search tools to narrow options

- Select Destination course and hit Submit
- "Select ALL" Course Materials.

- Highly Recommended: Do not change any settings except the options listed below. If you want to change a setting please contact Online Learning first.
- Discussion Board: Select "Include only the forums with no starter posts" (the second option) to make sure you do not copy old student and instructor posts into the new course.
- Announcements: If you do not re-use announcements from term to term, deselect Announcements.
If you accidentally copy your discussion threads, check out How to Delete Old Discussion Threads in New Class
- Keep "Copy Links and copies of the Content (include entire course home folder)"
- Submit

- You will be sent an email confirming that the course copy is complete. Most courses will finish copying within 20 minutes. During times of high volume, it may take longer. Be patient.
- ABSOLUTELY DO NOT CLICK SUBMIT MORE THAN ONCE.
- WAIT FOR THE CONFIRMATION EMAIL BEFORE PROCEEDING WITH ANY OTHER EDITING IN YOUR COURSE.
Problems?
Copied your course and still no content appears in the new course?
Check to make sure you did not reverse the Source course and Destination course. It happens. You can confirm this happened by visiting the Source course and reading the message along the top of the window -- it will tell you which course was copied to which destination. Luckily, copying in the reverse direction shouldn't harm your course contents. Just try again, making sure you enter the course with your content and copy it to the new or empty course.
Course Copy FAQ
The ability for instructors to copy their own courses has been around for several years now. Click the button below to open an archived FAQ about the process.
Blackboard Course Copy Process
Instructors can copy their courses in a few easy clicks.
When new course shells are created prior to an upcoming term, the new shells are empty and do not contain any content or structure. Once the term shell is available and you are ready, follow the Bb course copy process detailed on the main page (close this FAQ to return to the main page).
FAQs
- What if I am working in my NEW_ shell now? You can copy content from the DEV to the term shell using the same process.
- What if I have multiple sections of a course? Prepare one section and then copy to the others when done.
- What if I have merged sections? OL staff will still need to merge sections for instructors. Copy content into section W1 or H1 and edit only that section. Do not worry about copying content into the other sections.
- Is the empty shell the new accessible shell? The course shell is completely empty and your course will copy over as is.
- Can I have a copy of the accessible template instead? Of course! Contact Online Learning to get started.
- What if I copy the wrong course? Contact OL and we will clear it for you.
- What if I want to work on a course that is not scheduled yet? OL staff will work with you to open a course shell.
- When do new term shells appear? New term shells will be available shortly before registration for teh upcoming term beings. You can check to see when a term schedule will be available using the registration calendar.
- What if I don't want to see the next term shell yet? Simply hide it and you can reveal it on your menu when you are ready.
Date Management in Blackboard
Whenever you copy your course into a new term, be sure to update the availability and due dates for assignments, discussions and tests. Here's how you can update ALL of your dates in ONE go!
Run Date Management
- Click on Control Panel/Course Tools/Date Management
- Choose "List all Dates for Review" Start--> Process Runs --> Next

- Click "Select Item Types" and choose tools you want to update. TIP:Don't select Announcements as these sometimes range beyond a ten-week period.

- Select Date Types. Check the bottom right area of the page to see if all of your dates are listed. If not, click Show All before you continue. Best practice: Choose them all and note number Adaptively Released. If there are many, be prepared to document which items have date adaptive releases.

- EASY METHOD: Adjust Dates the fast way by number of days e.g. 105 days....

Tip:
Find the first day of the term in the original course. Let's say it was April 6. Then find the first day of the term in the new course (the one whose dates you are editing). Let's say September 7. Then go to Google and type in "How many days between April 6 and September 7?" With any luck, Google provides a numerical answer.
Enter that as the number of days to adjust by. And if you end up off by a day one direction or the other? Just adjust dates again. This time add one day or subtract one day. Yes, you can subtract. Just use the up or down arrows next to where you enter the number.
- HARD Way: Adjust Dates the slow way by manually entering in the calendar

Welcome to our new home!
Please update your Faculty Resources bookmarksSearch
Related Pages
Improve this Site
If you have a suggestion or would like to report a problem, send us your feedback.